Introduction
Tools imbued with advanced AI are rapidly becoming ubiquitous and a part of our everyday lives. Lately, we have seen a proliferation of large language models and image/video synthesis models that promise to unleash human creativity in the best-case scenario and put us out of jobs in the worst-case scenario.
Panic aside, my interest is in how these tools can help us be more productive and improve our cognition in general. The first tool that I made to explore this topic was an extension for the macOS app called Reycast. It allows users to interact with the OpenAI GPT3 AI model directly from the macOS desktop, thus putting one of the most potent AI language models just a few keystrokes away from anyone.
Continuing that line of exploration, I made Gist, a Safari Web Extension that uses OpenAI GPT3 AI to summarize the webpage user is browsing at the moment. I wrote a short post outlining challenges in using such an app here.
Building Gist was my first time using Swift programming language and building for macOS. So naturally, due to my lack of experience in this domain, I encountered many problems along the way, and in this post, I will document part of that technical journey. However, this will not be a complete step-by-step guide for building Safari extensions. Therefore, this post is geared toward people with some programming experience but little to no knowledge of development in the Apple ecosystem.
History of Extensions in Safari
Safari never had a great ecosystem for extensions, and it was always, and it still is, lagging behind Chrome. So let’s take a trip down memory lane.
In 2010 Apple introduced Safari 5, which added support for extensions and included Extension Builder, a software suite used to build browser extensions using HTML, CSS, and JavaScript. It did not require Xcode software. Developers could distribute these extensions freely, and users could install them from any source on the internet (besides the official Apple Extensions Gallery). If you want a blast from the past, check out this blog from 2011 that explains how to build them.
With Safari 12 in 2018, Apple dropped the support for the classic Safari Extensions built by Extension Builder and encouraged developers to transition to Safari App Extensions. Compared to legacy Safari Extensions, Safari App Extensions are always bundled with the macOS app, packaged by Xcode, and distributed only via the App Store. They are a combination of JavaScript, CSS, and native code written in Swift (or Objective C). Unfortunately, for many web developers using Xcode and Swift/Objective C turned out to be a major inconvenience.
Finally, at WWDC 2020, Apple announced Safari Web Extensions for macOS, and at WWDC 2021 for iOS. Similarly to Safari App Extensions, Web Extensions must be packaged with the underlying app and distributed through the App Store. But unlike Safari App Extensions, Web Extensions can (almost entirely) be built using JavaScript, HTML, and CSS, and the native app can be a simple empty shell. Safari Web Extensions utilize WebExtensions API (like Firefox and Chrome), although some APIs are still missing. Moreover, it is possible now to convert Chrome extensions to Safari Web Extensions and vice versa (with slight modifications, depending on the actual code). A decent introduction to the modern Safari Web Extensions is a Meet Safari Web Extensions session from WWDC 2020.
This post, then, covers the modern Safari Web Extensions.
Safari Web Extension Architecture
I have my issues with Apple Developer Documentation, but Creating a Safari web extension is a decent starting point for anyone completely new to this. It will guide you on how to start the project and what Xcode options to select.
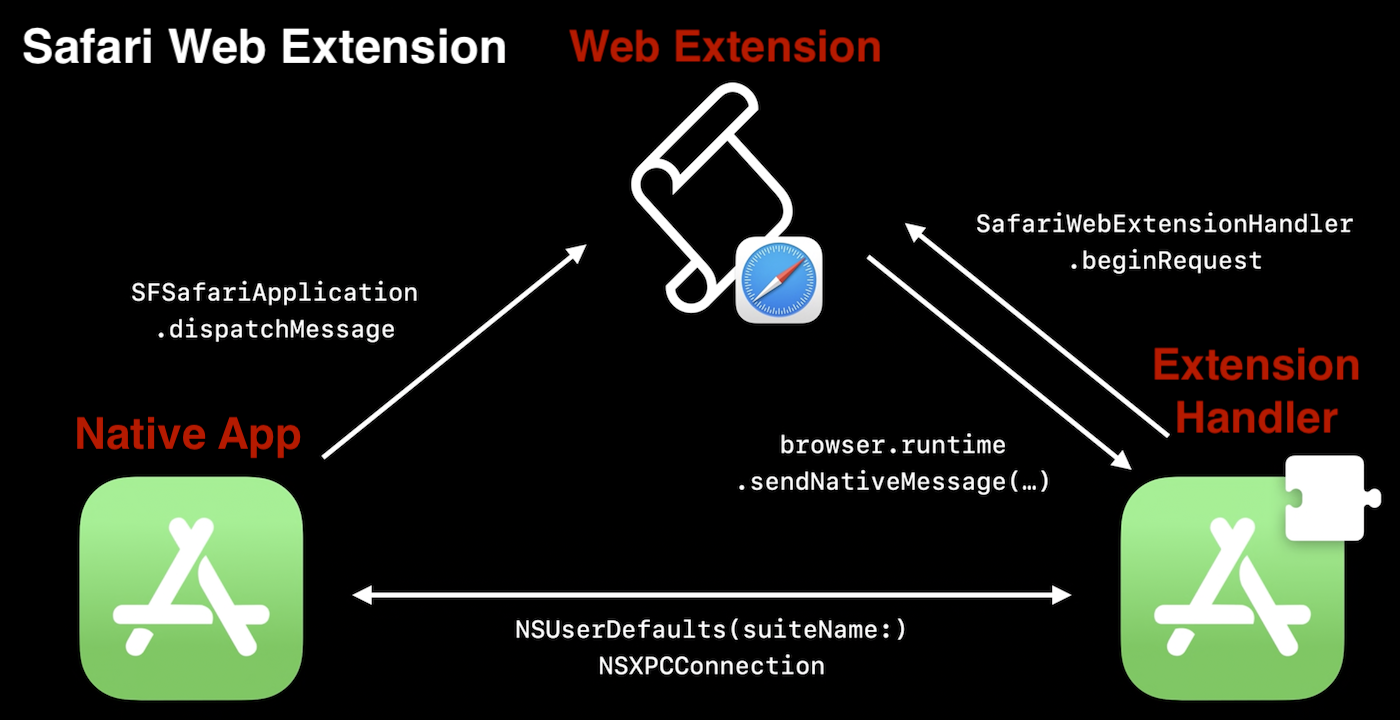
With that out of the way, let’s look at what makes Safari Web Extensions. They have three main components:
- Native app (macOS or iOS) built in Swift or Objective C.
- Extension Handler built in Swift or Objective C.
- Web Extensions built in JavaScript, HTML, and CSS.
Given Apple’s focus on security and privacy, all three components run in their own sandboxes and can communicate only through predefined channels and controlled data types. The following diagram shows the three components and the communication channels between them.

The entry point into our program is in the AppDelegate.swift and is marked by @main. Apple introduced this attribute in Swift 5.3 / Xcode 12. If you are interested to read more about that change, you can check the actual proposal, or these two blogs. In most cases, we don’t have to pay attention to it, so let’s look at the three main components.
Web Extension
The Web Extension component resides in the Safari browser, and in most cases, it will hold most of your extension logic. It consists of four(ish) scripts:
manifest.jsonpopup.js/popup.html/popup.csscontent.jsbackground.js
Manifest
manifest.json is a required file that your extension must have. It specifies basic metadata about the extension (e.g., name, version, icons) and aspects of its functionality (e.g., background scripts, content scripts, browser/toolbar actions). It is also where you add permissions your extension needs (e.g., native messaging).
"permissions": [
    "nativeMessaging"
]
Popup
Popup in this context is the window that opens when we click on the Safari toolbar icon of our extension. We fully define its functionality, layout, and style through the corresponding JavaScript, HTML, and CSS files.
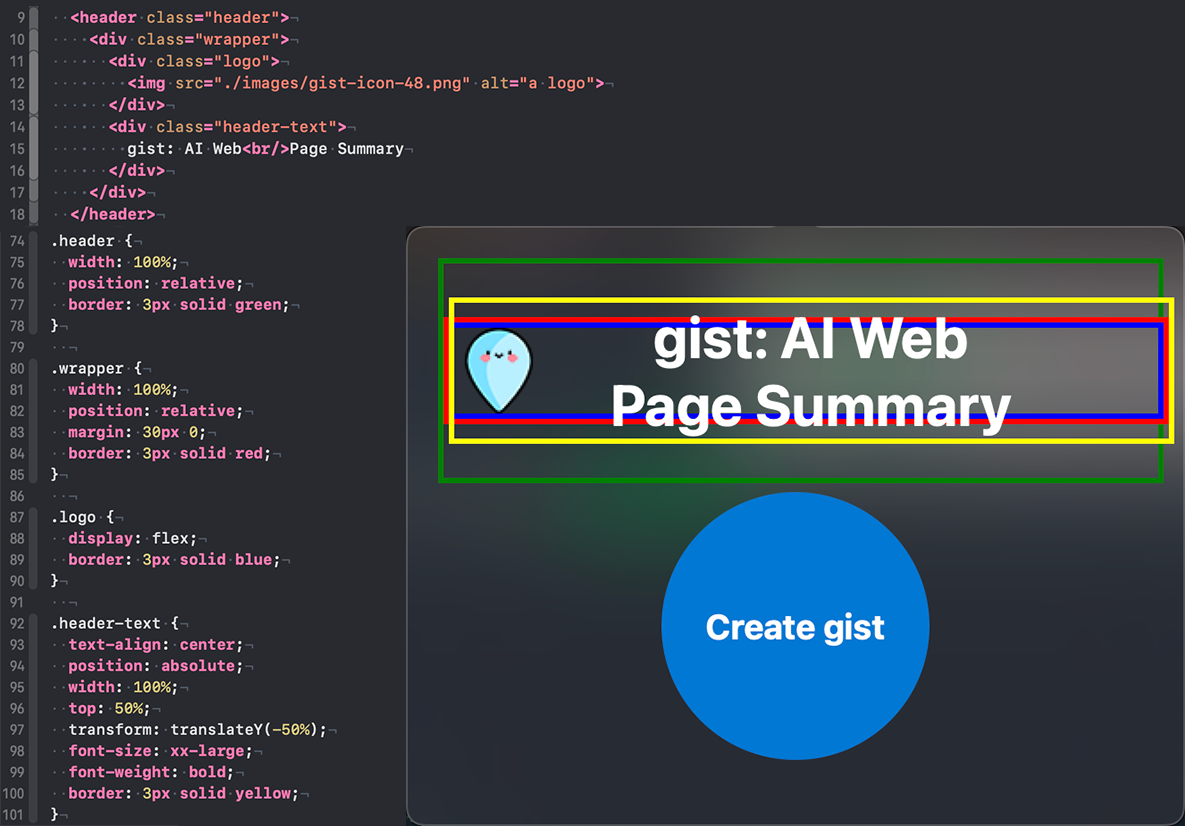
I had an issue with properly aligning the elements in the header, i.e., the logo on the left and the text in the middle. I solved it the following way through popup.html (top script) and popup.css (left script).

To check what all those css properties mean and do, you can consult CSS Reference guide.
The Gist extension has only one button. However, I also considered letting users choose the gist style. For that purpose we can use “radio” buttons). It would look something like this:
See the Pen radio buttons by Marko Simic (@simicvm) on CodePen.
Popup can’t communicate with the Native App or Extension Handler, but it can communicate with content.js and background.js. To send the message to content.js, we can use:
function notifyContentPage(e) {
    browser.tabs.query({active: true, currentWindow: true}, function(tabs) {
        if (tabs.length == 0) {
            console.log("could not send message to the current tab");
        } else {
            const sendingToContent = browser.tabs.sendMessage(tabs[0].id, {message: "summarize"});
            sendingToContent.then(handleResponse, handleError);
        }
    });
}
In Gist, the popup displays the summarized web page in the form of several bullet points. Just displaying the text received from GPT3 will result in messed-up formatting. In order to preserve the original formatting, we should put in popup.css:
.ai-summary-text {
    white-space: pre-wrap;
    text-align: left;
}
We can change the html element style ad hoc by getting the element using its identifier and setting the desired style, e.g., for an element demo we will set the background color to red:
const element = document.querySelector(".demo");
element.style.backgroundColor = "red";
In the case of Gist, we use this to modify the popup window after it receives the AI summary text.
Finally, to add the animation to the button, I followed a nice guide by Dom. Besides that guide, the internet is full of resources on CSS animation, but the two that I especially liked are Animista and Cool CSS Animation.
Content
content.js is the script that gets injected (automatically loaded) into the web page you are viewing. It can access the page DOM (Document Object Model), read from it, and modify it.
We need to specify on which web pages the script should be loaded. A good practice is to load it only on the target websites. In this way, we reduce the workload and potential for issues. manifest.json is the file where you do that. You can use an asterisk as a wildcard to capture all subdomains:
"content_scripts": [{
        "js": [ "content.js" ],
        "matches": [ "*://stackoverflow.com/*" ]
}]
To allow script on every web page, put instead:
"content_scripts": [{
      "js": [ "content.js" ],
      "matches": [ "<all_urls>" ]
  }]
To see the console output from content.js, we should open Safari → Develop → Show JavaScript Console.
In Gist, content.js implements the logic to scrape the website for the content we want AI to summarize. Extracting the salient text is a complex problem, and numerous libraries exist for that task. A good comparison between the most popular libraries is here. I ended up using Readability.js by Mozilla, used for Firefox Reader View. It does a decent job but is not always accurate, so your mileage will vary.
There are at least two ways to include this library in our extension. We can use a module bundler like webpack, Parcel, or Browserify, that package all of the external dependencies and main scripts into a single script. Alternatively, we can load the library from CDN on the fly using Skypack, which is what I chose. In particular, I handled it in the following way after receiving the signal from the popup:
import("https://cdn.skypack.dev/@mozilla/readability")
    .then((module) => {
        if (module.isProbablyReaderable(documentClone)) {
            console.log("Page is readable!");
            let article = new module.Readability(documentClone).parse();
            article.description = "extracted text";
            browser.runtime.sendMessage({ message: article }).then((response) => {
                console.log("Received response: ", response);
            });
        } else {
            console.log("Page is not readable!")
        }
    })
    .catch((error) => {
        console.log(error);
    });
In retrospect, this was not the best decision because some websites block this behavior in their Content Security Policy, rendering the extension unusable on those websites.
Background
This script runs in the background [sic] and is not tied to the particular web page. In it, we define activities our extension performs outside a specified webpage or browser window. But keep in mind that it can be unloaded by the browser at any point unless marked to be persistent in manifest.json.
background.js logs, using console.log(), are logged into a separate console which we can find in the Safari menu bar under Develop → Web Extension Background Pages → our-extension-name.
Communication with popup.js and content.js is done by either listening for the messages and responding to them or by sending the message directly:
// listening for the message from other scripts and responding to it
browser.runtime.onMessage.addListener((request, sender, sendResponse) => {
  console.log("Received request: ", request);
  if (request.greeting === "hello") {
    sendResponse({ farewell: "goodbye" });
  }
});

// sending the message directly
browser.runtime.sendMessage({ greeting: "hello" })
You can find a lot more details in the WebExtension API documentation.
Furthermore, background.js is the only script that can communicate with the Native App (or Extension Handler). As mentioned, we can achieve that by asking for nativeMessaging permission in manifest.json and using browser.runtime.sendNativeMessage, e.g.,
browser.runtime.sendNativeMessage("application.id", {message: "hello Native App"}, function(response) {
    console.log("Received sendNativeMessage response: ", response);
});
Extension Handler
SafariWebExtensionHandler primarily serves as a connection and communication channel between the Native App and Web Extension. Template for messaging passing between the Web Extension and it looks like:
import SafariServices
import os.log

class SafariWebExtensionHandler: NSObject, NSExtensionRequestHandling {

    func beginRequest(with context: NSExtensionContext) {
        // Unpack the message from Safari Web Extension.
        let item = context.inputItems[0] as? NSExtensionItem
        let message = item?.userInfo?[SFExtensionMessageKey]
        os_log(.default, "Received message from browser.runtime.sendNativeMessage: %@", message as! CVarArg)

        // Respond to the message
        let response = NSExtensionItem()
        response.userInfo = [ SFExtensionMessageKey: [ "Response to": message ] ]
        context.completeRequest(returningItems: [response], completionHandler: nil)
    }
}
The script above uses the os_log function to send messages to the logging system. However, that is an old way of doing it and is a bit clunky and rigid due to its requirement for static strings. Instead, we should use the newer Logger class introduced in Xcode 12 / Swift 5.3 / iOS 14. It has a cleaner syntax and supports swift string interpolation. You can find additional information in this blog, Apple documentation, and WWDC20 notes. We can view the logged messages in Console.app (and apparently Xcode console, but I never managed to enable that). Keep in mind that to actually see the sting in Console, we need to make them public explicitly, e.g., logger.log("Some log message: \(logMessage, privacy: .public)").
Besides the communication function, I also decided to implement OpenAI API interaction in the SafariWebExtensionHandler.
OpenAI API Interaction
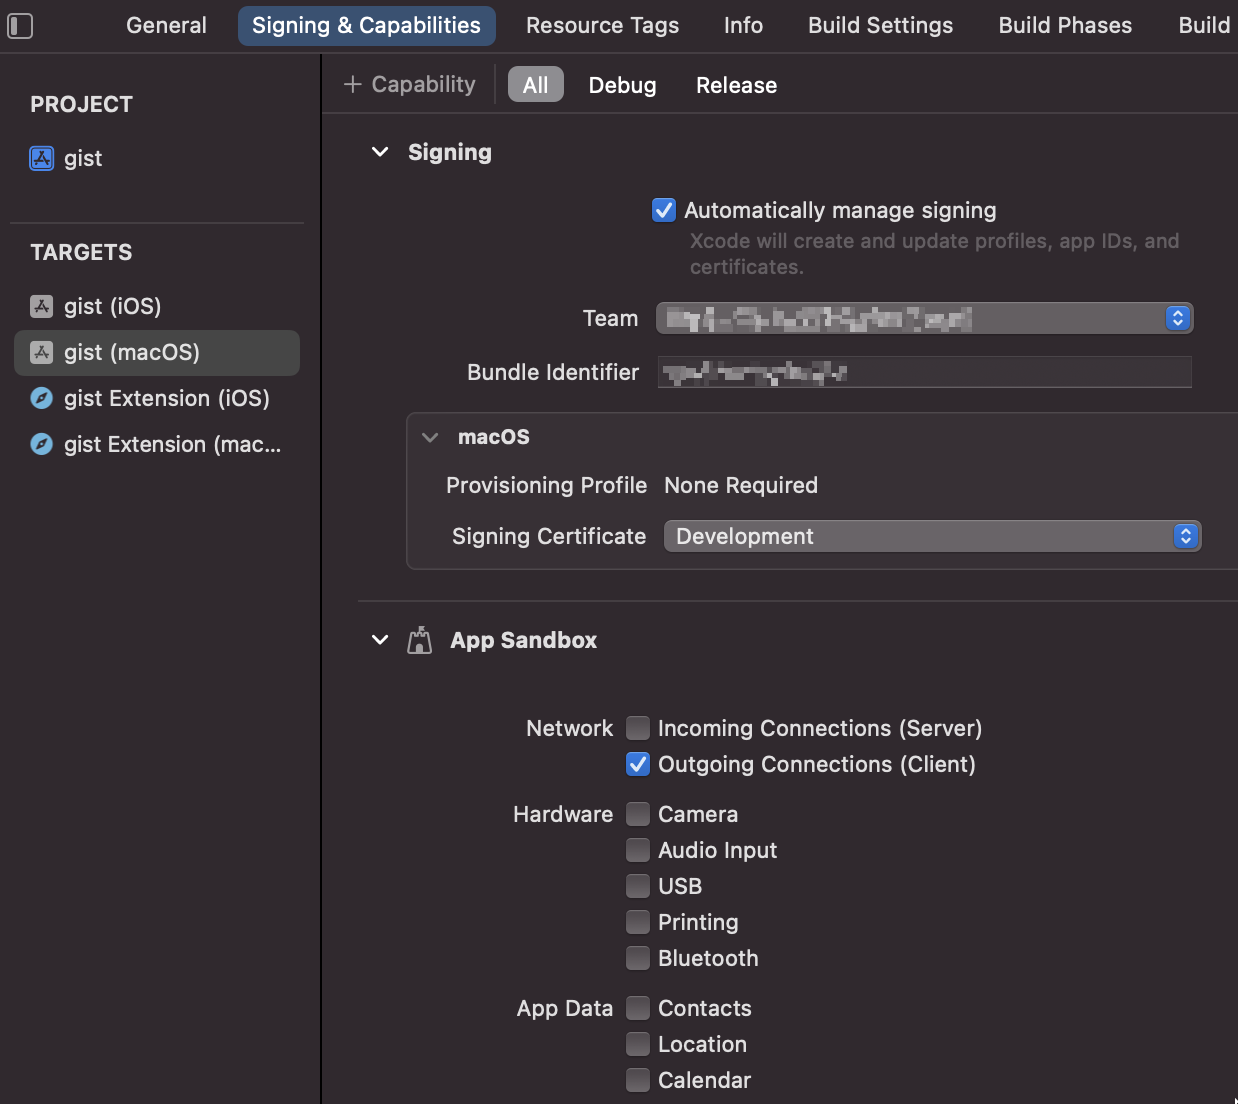
In order to enable the Extension Handler (and Native App) to make network requests (and use the API), we need to modify the project settings by checking Outgoing Connections (Client) in ~project page / Signing & Capabilities / App Sandbox:

OpenAI API does not have a native swift library, so I had to interact with it through POST HTTP requests. The basic API call is:
curl https://api.openai.com/v1/completions \
  -H 'Content-Type: application/json' \
  -H 'Authorization: Bearer YOUR_API_KEY' \
  -d '{
  "model": "text-davinci-002",
  "prompt": "Say this is a test",
  "max_tokens": 6,
  "temperature": 0
}'
And the response is:
    {
      "id": "cmpl-uqkvlQyYK7bGYrRHQ0eXlWi7",
      "object": "text_completion",
      "created": 1589478378,
      "model": "text-davinci-002",
      "choices": [
        {
          "text": "\n\nThis is a test",
          "index": 0,
          "logprobs": null,
          "finish_reason": "length"
        }
      ],
      "usage": {
        "prompt_tokens": 5,
        "completion_tokens": 6,
        "total_tokens": 11
      }
    }
Communication has to be JSON serialized. Therefore, the first step is to define structures, and then use JSONEncoder and JSONDecoder to encode and decode them. We also need to ensure that our structures are Codable.
struct requestBody: Codable {
    var model: String
    var temperature: Double
    var max_tokens: Int
    var prompt: String
}

struct responseBody: Codable {
    var id: String
    var object: String
    var created: Int
    var model: String
    var choices: [choices]
    var usage: [String: Int]
}

struct choices: Codable {
    var text: String
    var index: Int
    var logprobs: Int?
    var finish_reason: String
}

let params = requestBody(model: "text-davinci-002", temperature: 0.7, max_tokens: 372, prompt: "Say this is a test")
let jsonData = try? JSONEncoder().encode(params)

request.httpBody = jsonData
We add header fields in the request separately:
    request.setValue("application/json", forHTTPHeaderField: "Content-Type")
    request.setValue("Bearer \(apiKey)", forHTTPHeaderField: "Authorization")
Finally, to actually send the request and receive the response, we can use URLSession class and URLRequest structure. URLRequest is a structure that will hold elements like the target URL, headers, request body, etc., while URLSession is a class/object that coordinates a group of related network data transfer tasks. When creating URLSession for our task, we can either pass the custom configuration for it or use the shared type that is good for basic requests (and which I used in my app).
Native App
The Native App component is defined in our Xcode project’s Shared (App) folder. In the case when all our Extension operation is in the browser, it will just be an empty shell used to package the extension and publish it on the App Store. In the case of the gist extension, I used Native App to store the user’s OpenAI API key in the macOS Keychain.
We can build the UI for the Native App in a few ways, using Interface Builder in Xcode, SwiftUI, or WebKit. I chose WebKit primarily because the Safari Extension template starts like that. That allows us to define the UI through html, css, and javascript, similarly to how we did it for the popup component. Finally, @IBOutlet attributes in the ViewController script connect the UI elements (e.g., button) defined in the Interface Builder to its related code.
For the API key input field we can use password input type to conceal the sensitive information. However, if we just do that, we won’t be able to type in the password/key in that input field. That is because in Safari, user-select:text does not work by default. The solution is to define in css for the input element input { -webkit-user-select:text;}.
The best option to store the API key is to use Apple’s Keychain Services. I followed this excelent blog to implement it in my extension.
To implement concurrency in our app, we use Dispatch framework and its DiscpatchQueue. Keep in mind that UI-related work should be done on the main queue, while all others should run off it on the global queue.
I also struggled to add png images (for the icons) to the project. I used Photoshop to edit and save them, but Xcode does not like that. When saving with Photoshop, the file will get additional attributes, and Xcode will not import it correctly. The solution was to re-save that png using Apple’s Preview app.
Conclusion
Developing for macOS can be a fun and rewarding experience, but it does have its quirks (and features). In this post, I shared some tips and tricks I’ve learned along the way that will hopefully make your own journey into Safari development a little smoother.
Some of the next steps to ensure a great user experience would be to pay extra attention to the app performance, improve error handling, and add proper testing. However, I leave those things to the reader.
